11. Adding Use Cases
11.1. Work in a Feature Branch
Test and develop new use cases in a GitHub feature branch. More information on this process can be found in the GitHub Workflow chapter. If no GitHub issue for the new use case exists, create it, following the instructions to fill out the template. This branch will be the source of the pull request to merge the changes into the develop branch.
11.2. Types of Use Cases
Use cases that involve a single MET tool/METplus wrapper will reside in the METplus/parm/use_cases/met_tool_wrapper directory.
Use cases that involve multiple MET tools/METplus wrappers will reside in the METplus/parm/use_cases/model_applications directory, under a subdirectory that corresponds to a specific category.
11.3. Use Case Categories
New MET tool wrapper use cases will be put in the repository under parm/use_cases/met_tool_wrapper/<MET TOOL NAME> where <MET TOOL NAME> is the name of the MET tool being wrapped.
New model applications use cases will be put in the repository under parm/use_cases/model_applications/<CATEGORY> where <CATEGORY> is one of the following:
air_quality_and_comp
climate
clouds
data_assimilation
fire
extremes
land
marine_and_cryosphere
medium_range
miscellaneous
pbl
precipitation
s2s (Subseasonal to Seasonal)
s2s_mid_lat (Subseasonal to Seasonal: Mid-Latitude)
s2s_mjo (Subseasonal to Seasonal: Madden-Julian Oscillation)
s2s_stratosphere (Subseasonal to Seasonal: Stratosphere)
short_range (formerly convection_allowing_models)
space_weather
tc_and_extra_tc (Tropical Cyclone and Extratropical Cyclone)
If the new use case does not fall into any of these categories or it is unclear which category is the most appropriate, please create a post in the METplus GitHub Discussions Forum.
11.4. Use Case Content
11.4.1. Configure New Use Case
If creating a new MET tool wrapper use case, in the MET tool name sub-directory (parm/use_cases/met_tool_wrapper/<MET TOOL NAME>), each use case should have the following:
A METplus configuration file where the MET tool name follows PascalCase, e.g. GridStat.conf or ASCII2NC.conf. If the use case uses a Python embedding script, it should be indicated by adding “_python_embedding” to the MET tool name. e.g. GridStat_python_embedding.conf.
If creating a new model applications use case, in the category sub-directory (parm/use_cases/model_applications/<CATEGORY>), each use case should have the following:
A METplus configuration file named <MET-TOOL>_fcst<FCST>_obs<OBS>_cilmo<CLIMO><DESCRIPTOR>.conf where
<MET-TOOL> is the MET tool that performs the primary statistical analysis, i.e. GridStat or SeriesAnalysis.
<FCST> is the name of the forecast input data source (this can be excluded if no forecast data is used).
<OBS> is the name of the observation input data source (this can be excluded if no observation data is used).
<CLIMO> is the optional climatology input data source (this can be excluded if no climatology data is used).
<DESCRIPTOR> is an optional description that can include field category, number of fields, statistical types, and file formats.
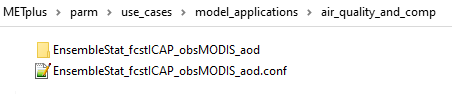
If the use case uses a Python Embedding script or any other additional files (besides input data), then put them in a sub-directory that matches the METplus configuration file name excluding the .conf suffix.

11.4.2. Use Case Rules
The name of the use case files should conform to the guidelines listed above in Use Case Content.
The use case METplus configuration file should not set any variables specific to the user’s environment, such as INPUT_BASE, OUTPUT_BASE, and PARM_BASE, METPLUS_CONF, etc.
A limited number of run times should be processed so that they use case runs in a reasonable amount of time. They are designed to demonstrate the functionality but not necessarily processed all of the data that would be processed for analysis. Users can take an example and modify the run times to produce more output as desired.
No errors should result from running the use case.
All data that is input to the use case (not generated by METplus) should be referenced relative to {INPUT_BASE} and the directory structure of the use case. For example, if adding a new model application use case found under model_applications/precipitation, the input directory should be relative to {INPUT_BASE}/model_applications/precipitation:
FCST_GRID_STAT_INPUT_DIR = {INPUT_BASE}/model_applications/precipitation
The input data required to run the use case should be added to the METplus input data directory on the primary DTC web server following the instructions here.
All data written by METplus should be referenced relative to {OUTPUT_BASE}:
GRID_STAT_OUTPUT_DIR = {OUTPUT_BASE}/grid_stat
The Sphinx documentation file should be as complete as possible, listing as much relevant information about the use case as possible. Keyword tags should be used so that users can locate other use cases that exhibit common functionality/data sources/tools/etc. If a new keyword is used, it should be added to the Quick Search Guide (docs/Users_Guide/quicksearch.rst). More information can be found here.
The use case should be run by someone other than the author to ensure that it runs smoothly outside of the development environment set up by the author.
11.4.3. Use Cases That Involve METcalcpy/METplotpy/METdataio
Some use cases call scripts that are located in METcalcpy, METplotpy, and/or METdataio. This could include the calculation of an index or pre-processing steps in METcalcpy, plotting in METplotpy, reading data using METdataio, or a combination of all three. These use cases typically run with a driver script that is called from METplus with the UserScript option. A driver script calls specific programs in METcalcpy, METplotpy, and/or METdataio and passes data from one program to the other.
Any changes to METcalcpy, METplotpy, and/or METdataio must be merged into the develop branch of those repositories so they will be available in the use case tests. This means that any pull requests in METcalcpy, METplotpy, and METdataio must be completed before use case testing can proceed in GitHub Actions. Please confirm that the use case can run successfully before creating a pull request.
To run in GitHub Actions, the environment specified in all_use_cases.txt must contain all required dependencies. This includes a Conda environment that contains the required Python packages needed to run the METplus Analysis Python tools, e.g. metplotpy_env. A list of the existing Conda Environments and the packages they contain can also be found in the Conda Environments section. If the package requirements aren’t met by one of the existing Conda Environments, please create a post on the METplus GitHub Discussions Forum for assistance.
11.4.3.1. Existing Use Case Examples
Below is a list of some (not all) of the use cases which use driver scripts and involve calculations in METcalcpy, METplotpy, and/or METdataio. This list is provided for reference and examples.
model_applications/s2s_mid_lat/UserScript_fcstGFS_obsERA_WeatherRegime
model_applications/s2s_stratosphere/UserScript_fcstGFS_obsERA_StratosphereQBO
model_applications/s2s_mjo/UserScript_obsCFSR_obsOnly_MJO_ENSO
model_applications/s2s/UserScript_fcstS2S_obsERAI_CrossSpectra
11.4.4. Use Cases That Cannot be Run in GitHub Actions
Below is a list of use cases in the repository that cannot be run in GitHub Actions due to either excessive memory or excessive disk space usage. They have been tested and cleared by reviewers of any other issues and can be used by METplus users in the same manner as all other use cases.
11.4.4.1. Use Cases that Exceed GitHub Actions Memory Limit
model_applications/marine_and_cryosphere/GridStat_fcstRTOFS_obsGHRSST_climWOA_sst
11.4.4.2. Use Cases that Exceed GitHub Actions Disk Space
model_applications/s2s_stratosphere/UserScript_fcstGFS_obsERA_StratospherePolar
model_applications/s2s_stratosphere/UserScript_fcstGFS_obsERA_StratosphereQBO
model_applications/short_range/MODEMultivar_fcstRRFS_obsGOES_MRMS_BrightnessTemp_Lightning
11.4.5. Document New Use Case
11.4.5.1. Create a New Model Applications Docs Directory
If the use case falls under an existing Model Applications category, skip this section.
If the use case is the first in a new Model Applications category, create the directory under docs/use_cases/model_applications if it does not already exist. Inside this directory, create a file called README.rst. Inside this file add the following each on a single line:
Title of category
Dashes (-) that are the exact same length as the title
A short description of the category
For example, docs/use_cases/model_applications/air_quality_and_comp/README.rst would look something like this:
Air Quality and Composition
---------------------------
A short description of this category goes here.
The content of this file is rendered above the icons for the use cases in this category in the User’s Guide > METplus Use Cases > Model Applications page.
11.4.5.2. Add Sphinx Documentation File
In the corresponding documentation MET tool name directory (docs/use_cases/met_tool_wrapper/<MET TOOL NAME>) for a met_tool_wrappers use case OR category directory for a model_applications use case (docs/use_cases/model_applications/<CATEGORY>), users will need to add a Python Sphinx Documentation (.py) file with the same name as the METplus configuration file.
The following is a discussion of the use case documentation template and all of its sections. The example template is available within the METplus repository. The example template should be used by users as a starting point, but will need to be completely updated with the use case’s information. The template applies to both met_tool_wrappers and model_applications use cases. When completing the template, users should read through each section and its description below before filling in a section, as some sections may not apply to the use case being documented. To assist reviewers and contributors, a special string:
# [UPDATE_SECTION_CONTENT]
has been added to each section described below. As you review the template and adapt it for your use case, please remove this line when you’ve decided the existing content is sufficient or after you’ve added content specific to your use case. For real examples, users are encouraged to review existing Model Applications use case documentation. Except for the Header and Path to Use Case Configuration File section, all lines should begin with the ‘#’ character to signify text, followed by at least one space before the text content. These are already provided in the example template.
Use Case Template Description:
Header and Path to Use Case Configuration File
This section begins with {PrimaryAnalysisToolName}: Brief (12 words or less) and a unique description of use case, followed on the next line by ‘=’ characters equal in length to the header (spaces included). Follow this with one line of no characters, then the path to the use case configuration file. This should be written in the format of model_applications/{use_case_category}/{use_case_configuration_file}. This section is preceded and followed by three ‘“‘ characters (i.e. PEP 257 Docstring convention.
Internal Table of Contents
This section consists of set language using Read The Docs notation, generating a table of contents within the use case documentation. This should be copied with no alterations.
Scientific Objective
This section should answer why this use case was created and included in the repository. What is a user gaining by using this use case? If the details do not add to the why this use case exists, those details do not belong in this section.
Version Added
This represents the METplus version number that this use case was added to the METplus repository. It also represents the minimum or lowest METplus version this use case has been tested against. It should not include betas (ex. Version 5.1 beta 3), but should include the two-digit version number.
Datasets
This section should include a brief description of each model dataset and variable field (10 m wind speed, 2 m temperature, etc.) being used in the use case, as well as which field (forecast, observation, climatology, masking, etc.) is using which dataset. At a minimum, users should list the Forecast, Observation, and Climatology fields. If they are not being used, “None” can be listed. Acronyms should be spelled out (i.e not GFS, but Global Forecast System). This section also includes a Location description consisting of set language of how users can access the use case data for themselves.
METplus Components
This section lists the tools that will be used during the use case. If there are multiple tools, a brief overview should be provided of what each tool is responsible for (i.e. GenVxMask for creating masks that are used in the verification step, which is completed by GridStat). If Python embedding is used, it can be mentioned here as well. It’s important to note that this section should NOT give detailed descriptions into why each tool is used, detailed information on how each tool is being used and interacting with other tools (if any), etc. If there is a desire to explain more about each tool’s role in the use case, the information can be presented in the “METplus Workflow” section.
METplus Workflow
This section should begin with the init or valid times (both beginning and end), time increment, as well as any lead times being used. This should be followed by descriptions of the number of times the use case will run (which could also be inferred from the init/valid times), what each tool is doing to a level of detail sufficient for users to understand the use case workflow, and any other special notes that users should be aware of. Note that if there is Python embedding, descriptions of what it accomplishes should be saved for the “Python Embedding” section. A mention of the input to the Python script and its returned dataset is sufficient for this section.
METplus Configuration
This section has set language that describes how all of the configuration files are loaded into METplus, followed by what’s passed in by the user at runtime, and used to produce the final configuration file that controls the METplus run. It concludes with an embedded link (and image) of the user’s configuration file the use case will run. The only two pieces that will change are the path to the use case’s configuration file, and the embedded configuration file for the use case.
MET Configuration
This section has set language that describes how settings in the MET configuration file will ultimately be used to run METplus, along with any changes made from the default by the user’s configuration file. It concludes with an embedded link (and image) of the default configuration file(s) for all MET tool(s) used. Any configuration file(s) listed will be hidden by default using a dropdown option. The only changes that need to occur for this section is which MET configuration file(s) is(are) embedded and the name of the dropdown. If no MET tool(s) are used, that should be noted here along with replacing the default language.
Python Embedding
This section should provide a description of any Python embedding that’s used in the use case. For a common definition, Python embedding is used to ingest a dataset not natively available for METplus intake, and results in a dataset being returned to METplus for analysis and verification purposes. This section should discuss what is passed to the script from METplus, what is being done by the script, and what data structure is passed back to METplus for evaluation. The end of this section is set language directing users to review the Python requirements in the MET User’s Guide, as well as an embedded link (and image) of all Python scripts used in Python Embedding. The links to these scripts will need to be updated by the user.
If no Python embedding is used, that should be noted here by stating “This use case does not use Python embedding.”
User Scripting
This section should provide a description of any Python scripting that’s used in the use case. For a common definition, User Scripting is any condition where the evaluation/verification/output processes are being completed inside the Python script, outside of METplus. Essentially, if a Python script is called and a METplus-readable dataset is not passed back to METplus, it is User Scripting. The METplus wrapper usage only exists to call the Python script. This section should discuss what is being done by the script and why the decision was made to use User scripting rather than Python embedding. The end of this section is an embedded link (and image) of all Python scripts used in User Scripting. The links to these scripts will need to be updated by the user.
If no User Scripting is used, that should be noted here by stating “This use case does not use additional scripts.”
Running METplus
Similar to “MET Configuration”, this section has set language that should not be altered. The only change between use cases is the path entered in the run command, which is use case specific.
Expected Output
This section begins with set language that shows what message a successful METplus run concludes with. Then, it should direct users to the proper folder (folders, if multiple outputs are made) and directory structure where the final output is. If the use case creates intermediate output, it should be mentioned here as well. A list of the files and folders that are created should be provided. Currently the documentation notation used to list all output is a copyable block which is created from the use of spacing and two “:” characters. This is done so that a browser’s rendering of the Expected Output list will not run off the page. If a netCDF is the output, the total number and name of each variable field inside the file should be listed. If there are numerous variable fields within the file, a summary is sufficient. If an image is created, it should be used as the use case image and referenced in this section as output. If no output is created, this section should explain why and what the user accomplished by running the use case.
Keywords
All keywords relevant to the use case should be added to this section as a bulleted list, as well as keeping the set language at the end of the list. If an important identifier for this use case is not currently set as a keyword in the METplus Quick Search for Use Cases, be sure to add it to the list of keywords before using it in the use case documentation. Instructions for doing so can be found in the Create New Quick Search Keyword section. Users should also use the end of this section to reference an image that will serve as a thumbnail for the use case. If no image is provided, a default image will be used; this is the same image used for all met_tool_wrapper use cases.
Note
Text that ends with an underscore (_) may be interpreted as a reference, so avoid ending a line with this character to avoid generating warnings in the documentation.
In addition to completing the above template, users should complete all of the (applicable) following documentation steps:
Update the list of External Dependencies (if applicable) to include any required Python packages. Update the Appendix A METplus Components Python Packages section. If the package is already listed, add a link to the documentation page for this new use case in the dropdown menu for that package, following the format in the dropdown menu. If the package is not already listed, update the dropdown menus to include the name of the required package, the version, the METplus component (e.g. METplus wrappers, METcalcpy, METplotpy), the source, a brief description of the package, and a link to this new use case that uses this new Python package.
Add an image to use as the thumbnail. Images can be added to the docs/_static directory and should be named <category>-<conf>.png where <category> is the use case category and <conf> is the name of the configuration file, i.e. air_quality_and_comp-EnsembleStat_fcstICAP_obsMODIS_aod.png. This is the same image that is referenced in the documentation file with this syntax:
# sphinx_gallery_thumbnail_path = '_static/air_quality_and_comp-EnsembleStat_fcstICAP_obsMODIS_aod.png'
11.4.5.3. Create New Quick Search Keyword
If a review of the keywords in the METplus Quick Search for Use Cases reveals that a new keyword would be beneficial, users can add a keyword using the following steps. Note that a keyword should be applicable to more than one existing use case, or seen as beneficial to upcoming use cases.
Open the quicksearch.rst file
Determine a name for the keyword following the format of the existing keywords in the appropriate section.
All keywords should be one word with the first letter of each word capitalized (i.e. CamelCase).
All keywords should end with “UseCase”
Keywords in the “Use Cases by MET Tool” section should end with “ToolUseCase”
Keywords in the “Use Cases by Application” section should end with “AppUseCase”
Keywords in the “Use Cases by Organization” section should end with “OrgUseCase”
Keywords in the “Use Cases by File Format” section should end with “FileUseCase”
Add new entries in alphabetical order under both html and latex sub-sections.
Under html, use the format | `<DESCRIPTOR> <../search.html?q=<KEYWORD>&check_keywords=yes&area=default>`_ where <DESCRIPTOR> is a human-readable description of the keyword and <KEYWORD> is the keyword.
Under latex, use the format | <DESCRIPTOR>: <KEYWORD> where <DESCRIPTOR> is a human-readable description of the keyword and <KEYWORD> is the keyword.
Add the keyword to the end of each use case documentation file under docs/use_cases that corresponds to the keyword.
11.4.6. Accessing the Documentation
It is important to ensure that the new use case files are displayed and the formatting looks correct. Prior to the release of METplus v4.0.0 contributors were required to build the documentation manually. However, the METplus components now use Read the Docs to build and display the documentation. For more information on how to view the newly added use case, see the Read the Docs METplus Documentation. Contributors can still build the documentation manually if desired. See the Build the Documentation Manually section below for more information.
11.4.7. Build the Documentation Manually
Build the documentation and ensure that the new use case file is displayed and the formatting looks correct. There is a conda environment called metplus_dev.vX.Y (where X.Y is the version of METplus that is currently in development) available on some of the NCAR development machines that can be used, e.g.:
conda activate /d1/personal/met_test/miniforge3/envs/metplus_dev.v6.1
Note
If conda is not already in PATH, find it and run it with the full path.
Or create a conda environment and install the packages from the docs/requirements.txt found in the METplus repo:
conda create --name sphinx_env --file METplus/docs/requirements.txt
To build the docs, run the build_docs.py script from the docs directory. Make sure the conda environment is activated or the required packages are available in the Python3 environment:
cd ~/METplus/docs
./build_docs.py
11.5. Input Data
Sample input data needed to run the use case should be provided. Please try to limit the input data to the minimum that is needed to demonstrate the use case effectively. GRIB2 files can be pared down to only contain the fields and/or vertical levels that are needed for using wgrib2.
Example: To create a file called subset.grib2 that only contains TMP data from file.grib2, run the following command:
wgrib2 file.grib2 | grep TMP | wgrib2 -i file.grib2 -grib_out subset.grib2
The egrep command can be used for more complex subsetting of grib2 data. Example: To create a file called subset.grib2 from file.grib2 that contains PRMSL data and TMP data on 1000, 900, 800, 700, 500, and 100 mb levels:
wgrib2 file.grib2 -s | egrep '(:TMP:1000 mb:|:TMP:900 mb:|:TMP:800 mb:|:TMP:700 mb:|:TMP:500 mb:|:TMP:100 mb:|:PRMSL)' | wgrib2 -i file.grib2 -grib subset.grib2
If the input data is in NetCDF format, the ncks tool can be used to subset the file(s).
11.5.1. Providing new data
11.5.1.1. Log into the computer where the input data resides
11.5.1.2. Switch to Bash
Run “bash” to activate a bash shell. This step isn’t necessary if bash is already the default shell. The met_test user’s default shell is bash. The instructions needed to run on the DTC web server will run smoothly in bash:
bash
Run the following command to see which shell is currently in use:
echo $SHELL
Warning
IMPORTANT: The following environment variables are set to make running these instructions easier. Make sure they are set to the correct values that correspond to the use case being added before copy/pasting any of these commands or there may be unintended consequences. Copy and paste these values after they have been modified into a text file that can be copied and pasted into the terminal.
11.5.1.3. Download the template environment file
This file is available on the DTC web server. Use ‘wget’ to download the file to the current working directory, or visit the URL in a browser and save it on the computer:
wget https://dtcenter.ucar.edu/dfiles/code/METplus/METplus_Data/add_use_case_env.bash
Or click this link.
11.5.1.4. Rename env file
Rename this file to include the feature branch. For example, if the branch is feature_ABC_desc, then run:
mv add_use_case_env.bash feature_ABC_desc_env.bash
11.5.1.5. Change the values of the env file
Open this file with an editor and modify it to include the appropriate information for the use case.
METPLUS_VERSION should only include the major and minor version. For example, if the next release is 4.0.0, set this value to 4.0. If the next release is 4.0.1, set this value to 4.0.
To determine the next version of METplus, call the run_metplus.py script (found in the ush directory of the METplus repository) without any arguments. The first line of output will list the current development version. The first 2 numbers displayed should correspond to the next major/minor release:
Running METplus 4.0.0-beta4-dev
If the above is shown, then METPLUS_VERSION should be set to 4.0
METPLUS_USE_CASE_CATEGORY should be one of the list items in the Use Case Categories section unless approval has been received to create a new category. For a new met_tool_wrapper use case, set this value to met_tool_wrapper.
METPLUS_USE_CASE_NAME should be the name of the new use case without the .conf extension, i.e. EnsembleStat_fcstICAP_obsMODIS_aod. If adding a new met_tool_wrapper use case, set this value to met_test_YYYYMMDD where YYYYMMDD is today’s date.
METPLUS_FEATURE_BRANCH should exactly match the name of the current working branch.
11.5.1.6. Source the env file and check environment
Source the environment file and verify that the variables are set correctly. If the source command fails, make sure that the current working shell is bash:
source feature_ABC_desc_env.bash
printenv | grep METPLUS_
Note
The value for METPLUS_USER_ENV_FILE should be the name of the environment file that was just sourced.
11.5.1.7. Create sub-directories for input data
Put new dataset into a directory that matches the use case directories, i.e. model_applications/${METPLUS_USE_CASE_CATEGORY}/${METPLUS_USE_CASE_NAME}. For a new met_tool_wrapper use case, put the data in a directory called met_test/new. All of the data required for the use case belongs in this directory so that it is clear which use case uses the data. Additional sub-directories under the use case directory can be used to separate out different data sources if desired.
11.5.1.8. Verify use case config file contains correct directory
Set directory paths in the use case config file relative to INPUT_BASE i.e {INPUT_BASE}/model_applications/<category>/<use_case> where <category> is the value that has been set for ${METPLUS_USE_CASE_CATEGORY} and <use_case> is the value that has been set for ${METPLUS_USE_CASE_NAME}. For a new met_tool_wrapper use case, use {INPUT_BASE}/met_test/new. Set {INPUT_BASE} to the local directory to test that the use case still runs properly.
11.5.1.9. Create new data tarfile
Create a tarfile on the development machine with the new dataset. Make sure the tarfile contains directories, i.e. model_applications/${METPLUS_USE_CASE_CATEGORY}. ONLY RUN THE COMMAND THAT IS APPROPRIATE TO YOUR CASE. READ CAREFULLY!
CONDITION 1: You are adding data for a single new use case:
tar czf ${METPLUS_NEW_DATA_TARFILE} model_applications/${METPLUS_USE_CASE_CATEGORY}/${METPLUS_USE_CASE_NAME}
CONDITION 2: You have more than one use case in the same category, and want to add data for all of those use cases at the same time:
tar czf ${METPLUS_NEW_DATA_TARFILE} model_applications/${METPLUS_USE_CASE_CATEGORY}/*
CONDITION 3: For a met_tool_wrapper use case, run:
tar czf ${METPLUS_NEW_DATA_TARFILE} met_test/new
Verify that the correct directory structure is found inside the tarfile:
tar tzf ${METPLUS_NEW_DATA_TARFILE}
The output should show that all of the data is found under the model_applications/<category>/<use_case> directory. For example:
model_applications/marine_and_cryosphere/
model_applications/marine_and_cryosphere/PlotDataPlane_obsHYCOM_coordTripolar/
model_applications/marine_and_cryosphere/PlotDataPlane_obsHYCOM_coordTripolar/weight_north.nc
model_applications/marine_and_cryosphere/PlotDataPlane_obsHYCOM_coordTripolar/rtofs_glo_2ds_n048_daily_diag.nc
model_applications/marine_and_cryosphere/PlotDataPlane_obsHYCOM_coordTripolar/weight_south.nc
11.5.1.10. Copy files to DTC Web Server
If you have access to the internal DTC web server, copy over the tarfile and the environment file to the staging directory:
scp ${METPLUS_NEW_DATA_TARFILE} mohawk.rap.ucar.edu:/d2/projects/METplus/METplus_Data_Staging/
scp ${METPLUS_USER_ENV_FILE} mohawk.rap.ucar.edu:/d2/projects/METplus/METplus_Data_Staging/
If you do not have access to the internal DTC web server, please follow the instructions for sending sample data using Google Drive. For more information on this process, please see “How to Send Us Data” on the Resources for Troubleshooting page.
11.5.2. Adding new data to full sample data tarfile
If you are unable to access the DTC web server to upload data or if permission has not been granted to use the met_test shared user account, someone from the METplus development team will have to complete the instructions in this section. Please let one of the team members know if this is necessary. Comment on the GitHub issue associated with this use case and/or email the team member(s) that have been coordinating with this work. If it is unclear who to contact, please create a post in the METplus GitHub Discussions Forum.
11.5.2.1. Log into the DTC Web Server with SSH
The web server is only accessible on the NCAR VPN.
ssh mohawk.rap.ucar.edu
11.5.2.2. Switch to the met_test user
The commands must be run as the met_test user to write into the data directory:
runas met_test
If unable to run this command successfully, please contact a METplus developer.
11.5.2.3. Setup the environment to run commands on web server
Change directory to the data staging dir, source the environment file that was created, and make sure the environment variables are set properly.
cd /d2/projects/METplus/METplus_Data_Staging
source feature_ABC_desc_env.bash
printenv | grep METPLUS_
11.5.2.4. Create a feature branch directory in the tarfile directory
As the met_test user, create a new directory in the METplus_Data web directory named after the branch containing the changes for the new use case. On the DTC web server:
cd ${METPLUS_DATA_TARFILE_DIR}
mkdir ${METPLUS_FEATURE_BRANCH}
cd ${METPLUS_FEATURE_BRANCH}
11.5.2.5. Copy the environment file into the feature branch directory
This will make it easier for the person who will update the tarfiles for the next release to include the new data (right before the pull request is merged into the develop branch):
cp ${METPLUS_DATA_STAGING_DIR}/${METPLUS_USER_ENV_FILE} ${METPLUS_DATA_TARFILE_DIR}/${METPLUS_FEATURE_BRANCH}
11.5.2.6. Check if the category tarfile exists already
Check the symbolic link in the develop directory to determine latest tarball:
export METPLUS_EXISTING_DATA_TARFILE=`ls -l ${METPLUS_DATA_TARFILE_DIR}/develop/sample_data-${METPLUS_USE_CASE_CATEGORY}.tgz | sed 's|.*->||g'`
echo ${METPLUS_EXISTING_DATA_TARFILE}
If the echo command does not contain a full path to sample data tarfile, then the sample data tarball may not exist yet for this category. Double check that no sample data tarfiles for the category are found in any of the release or develop directories.
11.5.2.7. Add contents of existing tarfile to feature branch directory (if applicable)
ONLY RUN THE COMMAND THAT IS APPROPRIATE TO THE USE CASE. READ CAREFULLY!
CONDITION 1: If there is an existing tarfile for the category (from the previous step), then untar the sample data tarball into the feature branch directory:
tar zxf ${METPLUS_EXISTING_DATA_TARFILE} -C ${METPLUS_DATA_TARFILE_DIR}/${METPLUS_FEATURE_BRANCH}
CONDITION 2: If no tarfile exists yet, skip this step.
11.5.2.8. Rename or modify existing data or data structure (if applicable)
If the reason for the feature branch is to adjust an existing use case, such as renaming a use case or changing the data file, then adjust the directory structure and/or the data files which should now be in the feature branch directory (from the last step). Changes to a use case name or input data for a pre-existing use case should be separately verified to run successfully, and noted in the Pull Request form (described later).
11.5.2.9. Add new data to feature branch directory
Untar the new data tarball into the feature branch directory:
tar zxf ${METPLUS_DATA_STAGING_DIR}/${METPLUS_NEW_DATA_TARFILE} -C ${METPLUS_DATA_TARFILE_DIR}/${METPLUS_FEATURE_BRANCH}
Verify that all of the old and new data exists in the directory that was created (i.e. model_applications/<category>).
11.5.2.10. Create the new tarfile
Create the new sample data tarball.
ONLY RUN THE COMMAND THAT IS APPROPRIATE TO THE USE CASE. READ CAREFULLY!
CONDITION 1: Model Application Use Case Example:
tar czf sample_data-${METPLUS_USE_CASE_CATEGORY}.tgz model_applications/${METPLUS_USE_CASE_CATEGORY}
CONDITION 2: MET Tool Wrapper Use Case Example:
tar czf sample_data-${METPLUS_USE_CASE_CATEGORY}.tgz met_test
11.5.2.11. Add volume_mount_directories file
Copy the volume_mount_directories file from the develop directory into the branch directory:
cp ${METPLUS_DATA_TARFILE_DIR}/develop/volume_mount_directories ${METPLUS_DATA_TARFILE_DIR}/${METPLUS_FEATURE_BRANCH}
IF YOU ARE ADDING A NEW USE CASE TO AN EXISTING CATEGORY, SKIP TO THE NEXT STEP.
If you are adding a new use case category, add a new entry to the volume mount directories file for the new category. Add the new entry in alphabetical order so it is easier for others to review. The format of this file follows <category>:model_applications/<category>, e.g. climate:model_applications/climate.
11.5.2.12. Log out of DTC Web Server
The rest of the instructions are run on the machine where the use case was created and tested.
11.5.3. Trigger Input Data Ingest
IF WORKING IN THE *dtcenter/METplus REPOSITORY*, PLEASE SKIP THIS STEP.
If working in a forked METplus repository, the newly added input data will not become available for the tests unless it is triggered from the dtcenter repository. A METplus developer will need to run the Update Input Test Data (update_input_data.yml) GitHub Actions workflow to trigger it. Please provide them with the name of the branch that will be used to create the pull request with the new use case.
11.5.4. Add use case to the test suite
The internal/tests/use_cases/all_use_cases.txt file in the METplus repository contains the list of all use cases. Add the new use case to this file so it will be available in the tests. See the All Use Cases section for details.
11.5.5. Add new category to test runs
The .github/parm/use_case_groups.json file in the METplus repository contains a list of the use case groups to run together. Add a new entry to the list that includes the category of the new use case, the list of indices that correspond to the index number described in the Add use case to the test suite section.
See the Use Case Groups section for details.
Set the “run” variable to true so that the new use case group will run in the automated test suite whenever a new change is pushed to GitHub. This allows users to test that the new use case runs successfully.
Example:
{
  "category": "climate",
  "index_list": "2",
  "run": true
}
Note
Make sure there is a comma after the curly braces for the item that comes before the new item in the list.
This example adds a new use case group that contains the climate use case with index 2 and is marked to “run” for every push.
Note
Be sure to remember and change the “run” entry in this file to false prior to the final merge after pull request review. This will trigger a complete run of the testing suite prior to merging, so allow time for that to complete as well.
New use cases are added as a separate item to make reviewing the test results easier. A new use case will produce new output data that is not found in the “truth” data set which is compared to the output of the use case runs to check if code changes altered the final results. Isolating the new output will make it easier to verify that the only differences are caused by the new data. It also makes it easier to check the size of the output data and length of time the use case takes to run to determine if it can be added to an existing group or if it should remain in its own group.
11.5.6. Monitoring Automated Tests
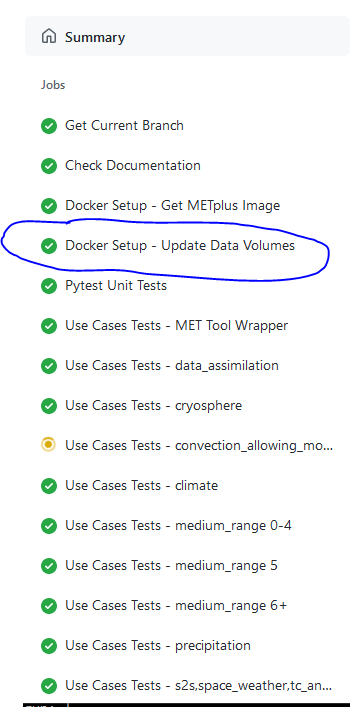
All of the use cases in the METplus repository are run via GitHub Actions to ensure that everything runs smoothly. If the above instructions to add new data were followed correctly, then GitHub Actions will automatically obtain the new data and use it for the tests when the changes are pushed to GitHub. Adding the use case to the test suite will allow the ability to check that the data was uploaded correctly and that the use case runs in the Python environment created in Docker. The status of the tests can be viewed on GitHub under the Actions tab. The feature branch should be found in the list of results near the top. At the far left of the entry will be a small status icon:
A yellow circle that is spinning indicates that the build is currently running.
A yellow circle that is not moving indicates that the build is waiting to be run.
A green check mark indicates that all of the jobs ran successfully.
A red X indicates that something went wrong.
A gray octagon with an exclamation mark (!) inside means it was canceled.
Click on the text next to the icon (last commit message) to see more details.
11.5.6.1. Verifying that new input data was found
On the left side of the window there will be a list of jobs that are run. Click on the job titled “Docker Setup - Update Data Volumes”
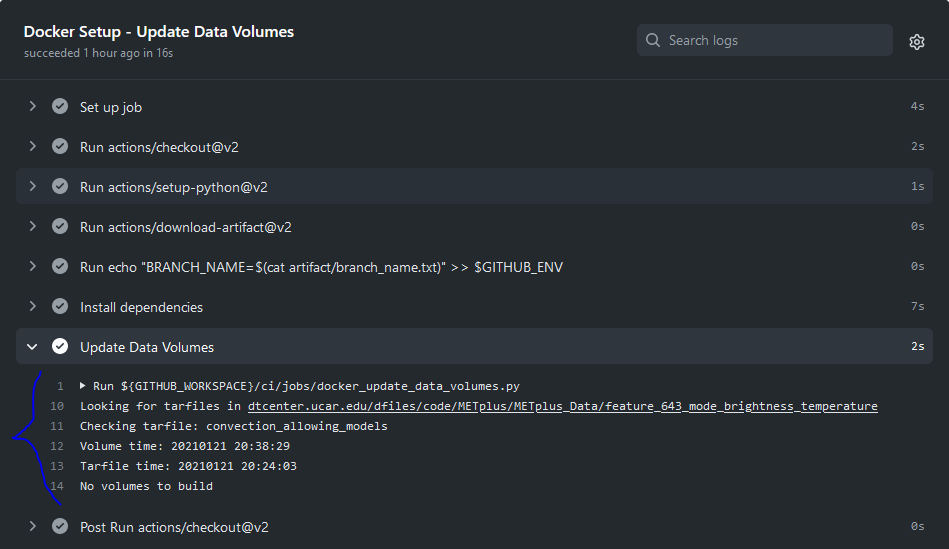
On this page, click the item labeled “Update Data Volumes” to view the log output. If the new data was found properly, there will be output saying “Will pull data from…” followed by the path to the feature branch directory. It will also list the dataset category that will be added.

If the data volume was already successfully created from a prior job, the script will check if the tarfile on the web server has been modified since the data volume was created. It will recreate it if it has been modified or do nothing for this step otherwise.
If the log file cannot find the directory on the web server, then something went wrong in the previous instructions.
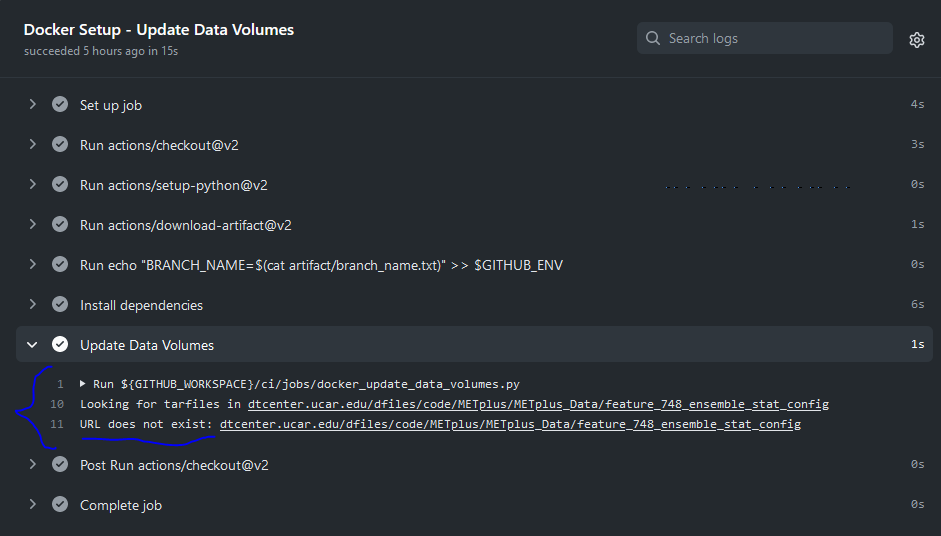
If this is the case and data should be found, repeat the instructions to stage the input data or post in the METplus GitHub Discussions Forum for assistance.
11.5.6.2. Verify that the use case ran successfully
Please verify that the use case was actually run by referring to the appropriate section under “Jobs” that starts with “Use Case Tests.” Click on the job and search for the use case config filename in the log output by using the search box on the top right of the log output.
If the use case fails in GitHub Actions but runs successfully in the user’s environment, potential reasons include:
Errors providing input data (see Input Data)
Using hard-coded paths from the user’s machine
Referencing variables set in the user’s configuration file or local environment
Memory usage of the use case exceeds the available memory in the GitHub Actions environment
Disk space usage of the use casee exceeds the available space in the GitHub Actions environment
GitHub Actions has limited memory available and will cause the use case to fail when exceeded. A failure caused by exceeding the memory allocation in a Python Embedding script may result in an unclear error message. If it is suspected that this is the case, consider utilizing a Python memory profiler to check the Python script’s memory usage. If the use case exceeds the limit, try to pare down the data held in memory and use less memory intensive Python routines.
Additionally, GitHub Actions has limited disk space available. The use case will fail if the data files exceed the available disk space. If this is the case, consider removing any unneeded variables from the data files, reducing the time steps run, or creating a new use case category to keep file sizes down for each group.
If memory mitigation cannot move the use case’s memory usage below the GitHub Actions limit or data cannot be reduced further to fit inside the available disk space see Use Cases That Cannot be Run in GitHub Actions for next steps.
11.5.6.3. Verify that the use case ran in a reasonable amount of time
Find the last successful run of the use case category job and compare the time it took to run to the run that includes the new use case. The time for the job is listed in the Summary view of the latest workflow run next to the name of the job. If the time to run has increased by a substantial amount, please look into modifying the configuration so that it runs in a reasonable time frame.
If the new use case runs in a reasonable amount of time but the total time to run the set of use cases is now above 20 minutes or so, consider creating a new job for the new use case. See the Subset Category into Multiple Tests section and the multiple medium_range jobs for an example.
11.5.7. Overriding configuration for automated tests
The automated tests have limited resources available to run the use cases. Use cases can be adjusted to reduce file size, run time length, memory usage, etc. but may still exceed the limits provided by GitHub Actions. We also want to avoid losing scientific significance of a use case to allow it to run in the automated testing environment.
An additional METplus configuration file can be provided with a use case to override certain configuration settings for the automated testing of the case. This allows the use case configuration file to contain a useful example that can be run on other environments while still allowing a subset of the use case to be included in the automated use case tests.
If needed, create a file named ci_overrides.conf in the use case directory, e.g. parm/use_cases/model_applications/clouds/GridStat_fcstGFS_obsERA5_lowAndTotalCloudFrac/ci_overrides.conf. This configuration file will automatically be read after the use case configuration file when run in the automated testing environment.
For example, if a use case processes many thresholds:
[config]
...
FCST_VAR1_THRESH = gt0, lt10.0, ge10.0, ge20.0, ge30.0, ge40.0, ge50.0, ge60.0, ge70.0, ge80.0, ge90.0
...
OBS_VAR1_THRESH = gt0, lt10.0, ge10.0, ge20.0, ge30.0, ge40.0, ge50.0, ge60.0, ge70.0, ge80.0, ge90.0
...
then one can override these variables so that fewer threshold values are processed in the automated tests. In ci_overrides.conf, set:
[config]
FCST_VAR1_THRESH = gt0, lt10.0
OBS_VAR1_THRESH = gt0, lt10.0
11.5.8. Use Cases That Cannot be Run in GitHub Actions
If a use case utilizing Python embedding does not run successfully in GitHub Actions due to exceeding the memory limit and memory mitigation steps were unsuccessful in lowering memory usage, or if a use case does run successfully in GitHub Actions due to exceeding available disk space and the data cannot be further pared down, please take the following steps.
Document the GitHub Actions failure in the GitHub use case issue. Utilize a Python memory profiler to identify as specifically as possible where the script exceeds the memory limit (if the failure is due to exceeding the memory limit).
Add the use case to the Use Cases That Cannot be Run in GitHub Actions list.
In the internal/tests/use_cases/all_use_cases.txt file, ensure that the use case is listed as the lowest-listed use case in its respective category. Change the number in front of the new use case to an ‘X’, preceded by the ‘#’ character:
#X::GridStat_fcstRTOFS_obsGHRSST_climWOA_sst::model_applications/marine_and_cryosphere/GridStat_fcstRTOFS_obsGHRSST_climWOA_sst.conf:: icecover_env, py_embedIn the .github/parm/use_case_groups.json file, remove the entry that was added during the Add new category to test runs for the new use case. This will stop the use case from running on a pull request.
Push these two updated files to the working branch in GitHub and confirm that it now compiles successfully.
During the Create a Pull Request creation, inform the reviewer of the GitHub Actions failure. The reviewer should confirm the use case is successful when run manually, that the memory profiler output confirms that the Python embedding script exceeds the GitHub Actions limit, and that there are no other GitHub Actions compiling errors.
11.6. Create a Pull Request
Create a pull request to merge the changes from the working branch into the develop branch. More information on this process can be found in the GitHub Workflow chapter under Open a pull request using a browser.
11.7. Pull Request Reviewer Instructions
11.7.1. Update the develop data directory
Once the person reviewing the pull request has verified that the new use case was run successfully using the new data, they will need to update the links on the DTC web server before the pull request is merged so that the develop branch will contain the new data.
11.7.1.1. Log into the DTC Web Server with SSH
The web server is only accessible on the NCAR VPN.
ssh mohawk.rap.ucar.edu
11.7.1.2. Switch to the met_test user
Commands must run as the met_test user:
runas met_test
11.7.1.3. Change directory to the METplus Data Directory
cd /d2/www/dtcenter/dfiles/code/METplus/METplus_Data
Source the environment file for the feature. The relative path will look something like this:
source feature_ABC_desc/feature_ABC_desc_env.sh
11.7.1.4. Compare the volume_mount_directories file
Compare the feature branch file to the upcoming METplus version directory file:
diff ${METPLUS_FEATURE_BRANCH}/volume_mount_directories v${METPLUS_VERSION}/volume_mount_directories
ONLY RUN THE COMMAND THAT IS APPROPRIATE TO THE USE CASE. READ CAREFULLY!
CONDITION 1: IF there is a new entry or change in the feature version, copy the feature file into the upcoming METplus version directory and the develop directory:
cp ${METPLUS_FEATURE_BRANCH}/volume_mount_directories v${METPLUS_VERSION}/volume_mount_directories
cp ${METPLUS_FEATURE_BRANCH}/volume_mount_directories develop/volume_mount_directories
11.7.1.5. Copy data from the feature directory into the next version directory
11.7.1.5.1. Copy files
Make sure the paths are correct before copying. Paths may need to be adjusted.
ONLY RUN THE COMMAND THAT IS APPROPRIATE TO THE USE CASE. READ CAREFULLY!
CONDITION 1: Model Applications Use Cases:
from_directory=${METPLUS_DATA_TARFILE_DIR}/${METPLUS_FEATURE_BRANCH}/model_applications/${METPLUS_USE_CASE_CATEGORY}/${METPLUS_USE_CASE_NAME}
echo $from_directory
ls $from_directory

to_directory=${METPLUS_DATA_TARFILE_DIR}/v${METPLUS_VERSION}/model_applications/${METPLUS_USE_CASE_CATEGORY}
echo $to_directory
ls $to_directory || echo CREATING $to_directory && mkdir -p $to_directory
Note: If the use case is being added to a new use case category, the above command will create the directory for the new category if it does not already exist.
OR
CONDITION 2: MET Tool Wrapper Use Cases:
from_directory=${METPLUS_DATA_TARFILE_DIR}/${METPLUS_FEATURE_BRANCH}/met_test/new
echo $from_directory
ls $from_directory

to_directory=${METPLUS_DATA_TARFILE_DIR}/v${METPLUS_VERSION}/met_test
echo $to_directory
ls $to_directory
After verifying the directories are correct, copy the files:
cp -r $from_directory $to_directory/
Note
If data for multiple use cases are included, change the value of METPLUS_USE_CASE_NAME and rerun these steps for each.
11.7.1.5.2. Remove old data (if applicable)
If the pull request notes mention an old directory path that should be removed, please remove that directory from the next release version directory (vX.Y). Be careful not to remove any files that are still needed.
11.7.1.5.3. Handle existing tarfile in vX.Y
List the tarfile for the use case category in the next release version directory:
cd ${METPLUS_DATA_TARFILE_DIR}/v${METPLUS_VERSION}
ls -lh sample_data-${METPLUS_USE_CASE_CATEGORY}*
ONLY RUN THE COMMAND THAT IS APPROPRIATE TO THE USE CASE. READ CAREFULLY!
CONDITION 1: IF the latest version of the tarfile is in this directory, then rename the existing sample data tarball for the use case category just in case something goes wrong:
mv sample_data-${METPLUS_USE_CASE_CATEGORY}-${METPLUS_VERSION}.tgz sample_data-${METPLUS_USE_CASE_CATEGORY}-${METPLUS_VERSION}.sav.`date +%Y%m%d%H%M`.tgz
OR
CONDITION 2: IF the sample data tarfile for the category is a link to another METplus version, then simply remove the tarfile link:
unlink sample_data-${METPLUS_USE_CASE_CATEGORY}.tgz
OR
CONDITION 3: IF the sample data tarfile for the category does not exist (because it is a new use case category), continue to the next step.
11.7.1.5.4. Create the new sample data tarfile
ONLY RUN THE COMMAND THAT IS APPROPRIATE TO THE USE CASE. READ CAREFULLY!
CONDITION 1: Model Applications Use Cases:
tar czf sample_data-${METPLUS_USE_CASE_CATEGORY}-${METPLUS_VERSION}.tgz model_applications/${METPLUS_USE_CASE_CATEGORY}
OR
CONDITION 2: MET Tool Wrapper Use Cases:
tar czf sample_data-${METPLUS_USE_CASE_CATEGORY}-${METPLUS_VERSION}.tgz met_test
11.7.1.6. Update the link in the develop directory if needed
Check if the develop directory contains a symbolic link to an older version of the tarfile. Note: These commands must be run together (no other commands in between) to work:
cd ${METPLUS_DATA_TARFILE_DIR}/develop
ls -lh sample_data-${METPLUS_USE_CASE_CATEGORY}.tgz | grep ${METPLUS_VERSION}
if [ $? != 0 ]; then echo Please update the link; else echo The link is already correct; fi
IF the screen output says “The link is already correct” then DO NOT RUN THE NEXT COMMAND. IF it says “Please update the link” then please listen to the polite instructions:
unlink sample_data-${METPLUS_USE_CASE_CATEGORY}.tgz
ln -s ${METPLUS_DATA_TARFILE_DIR}/v${METPLUS_VERSION}/sample_data-${METPLUS_USE_CASE_CATEGORY}-${METPLUS_VERSION}.tgz sample_data-${METPLUS_USE_CASE_CATEGORY}.tgz
Check that the link now points to the new tarfile that was just created:
ls -lh sample_data-${METPLUS_USE_CASE_CATEGORY}.tgz
11.7.2. Return the test run setting to false
In the .github/parm/use_case_groups.json file, return the run setting to false for the new use case in Add new category to test runs and commit the file to the feature branch. This will trigger a full run of the automated testing suite, so allow time for that to complete prior to merging.
Example (note the setting for run):
{
  "category": "climate",
  "index_list": "2",
  "run": false
}
11.8. After the Pull Request is Approved
11.8.1. Merge the pull request and review testing workflow run
Merge the pull request on GitHub. Then go to the “Actions” tab and monitor the latest develop branch run. This run should “fail” with a red X. Ensure that the only failures are in the use case that was added and that the failures are only in the Run difference tests job. Any failures in a “Run Use Cases” job suggest that something went wrong. A failing use case is likely due to the develop branch data not being updated.

If the circle on the left side is yellow, then the run has not completed yet. If you have confirmed that the only failures are due to difference in new use case output, then follow the instructions below to update the truth data.
11.8.2. Consider rearranging the use case groups
If another group of use cases in the same category exists, consider adding the new use case to an existing group to speed up execution. If a new use case runs quickly (check the time next to the use case group in the diagram found on the Summary page of each GitHub Actions run), produces a reasonably small sized output data artifact (found at the bottom of a completed GitHub Actions run), and the same applies to another group of same category, it would make sense to combine them. In the .github/workflow/testing.yml file, modify the categories list under the “use_case_tests” job (see Add new category to test runs). For example, if the following is found in the list:
- "met_tool_wrapper:0-53"
and the new use case is defined with:
- "met_tool_wrapper:54"
then combine the two list items into a single item:
- "met_tool_wrapper:0-54"
11.8.3. Update the Truth Data
The addition of a new use case results in new output data. When this happens, the reference branch needs to be updated so that future pull requests will compare their results to a “truth” data set that contains the new files.
Follow the instructions for using the Update and Upload Truth Data (update_truth_data.yml) GitHub Actions workflow to perform this step.
11.8.4. Clean Up DTC Web Server
11.8.4.1. Remove the saved copy of the sample data tarfile
Check if there are any “sav” files in the METplus version directory:
cd ${METPLUS_DATA_TARFILE_DIR}/v${METPLUS_VERSION}
ls -lh sample_data-${METPLUS_USE_CASE_CATEGORY}-${METPLUS_VERSION}.sav.*.tgz
If there is more than one file with “sav” in the filename, make sure that the file removed is the file that was created for this feature.
11.8.4.2. Remove the feature branch data directory
If more development is needed for the feature branch, do not remove the directory. If the work is complete, then remove the directory:
ls ${METPLUS_DATA_TARFILE_DIR}/${METPLUS_FEATURE_BRANCH}
rm -rf ${METPLUS_DATA_TARFILE_DIR}/${METPLUS_FEATURE_BRANCH}
11.8.4.3. Clean up the staging directory
Remove the tarfile and environment file from the staging directory:
cd ${METPLUS_DATA_STAGING_DIR}

ls ${METPLUS_NEW_DATA_TARFILE}
rm ${METPLUS_NEW_DATA_TARFILE}

ls ${METPLUS_USER_ENV_FILE}
rm ${METPLUS_USER_ENV_FILE}